Building a custom laptop battery is a rewarding challenge for any electronics enthusiast. It allows you to revive an old machine or extend runtimes far beyond factory limits. However, the heart of this project isn't just the cells. It is the Battery Management System (BMS).
Why the BMS Matters
A lithium-ion battery is a chemical powerhouse. Without constant supervision, these cells can become unstable. The BMS acts as the "brain" of your battery pack. It monitors voltage, current, and temperature in real-time.
Laptops require precise power delivery. Most modern laptops use a 3S (11.1V) or 4S (14.8V) configuration. If one cell overcharges, it risks a thermal event. Conversely, over-discharging a cell can permanently kill its capacity.
The Rise of DIY Power Solutions
Many users turn to DIY solutions due to the "Right to Repair" movement. Original equipment manufacturer (OEM) batteries are often discontinued or overpriced. By sourcing high-quality 18650 or 21700 cells, you can often exceed original specs.
Data shows that premium DIY packs can offer 20-30% more energy density than generic replacements. This improvement depends entirely on your choice of BMS. A low-quality board may lack the communication protocols your laptop needs to boot.
Decoding BMS Specifications for Laptops
Selecting a BMS requires more than matching voltage. You must align the board's peak current and communication logic with your laptop's motherboard. A mismatch can lead to hardware failure or a battery the system refuses to recognize.
Understanding Current and Voltage Limits
Laptop processors and GPUs pull power in bursts. A standard ultrabook might draw 2 to 3 Amps during light tasks. However, heavy rendering or gaming can spike this to 10 Amps or more.
Your BMS must have a continuous discharge rating that exceeds your laptop's maximum draw. For most DIY builds, a 15A to 20A BMS provides a safe buffer. This overhead prevents the board from overheating during intense workloads.
The Importance of Communication Protocols
Standard protection boards only cut power during faults. Laptop batteries, however, are "smart." They communicate with the BIOS using the System Management Bus (SMBus) or I2C protocol.
This data line shares vital stats like cycle count and remaining capacity. If your DIY BMS lacks a gas gauge IC (like the TI BQ series), your laptop may display a "0% battery" error. Always look for boards that support SMBus 1.1 or higher for modern compatibility.
Balancing and Protection Features
Cell imbalance is the primary cause of premature battery death. A high-end BMS features active or passive balancing. This ensures every cell in your 3S or 4S string reaches the same voltage.
- Over-discharge Protection: Stops the battery at roughly 3.0V per cell.
- Over-charge Protection: Cuts input at 4.2V or 4.25V per cell.
- Short-circuit Protection: Acts as a digital fuse to prevent fires.
Matching Chemistry to the Controller
Most DIYers use Lithium-ion (Li-ion) or Lithium Polymer (Li-Po). Ensure your BMS is specifically tuned for these chemistries. Li-ion cells typically have a nominal voltage of 3.6V or 3.7V.
Using a LiFePO4 BMS on Li-ion cells is dangerous. The voltage thresholds are significantly lower and will cause a malfunction. Research your cell's data sheet before finalizing your BMS purchase to ensure a perfect match.
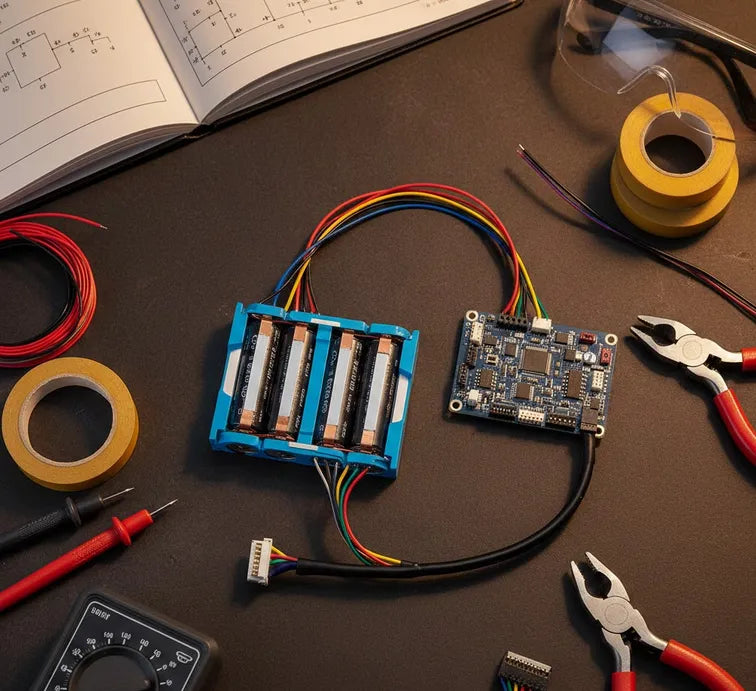
The DIY Assembly: Cells, Wiring, and Safety
Once you have selected the correct BMS, the physical assembly begins. This phase requires extreme precision and a "safety-first" mindset. A single short circuit during assembly can vent a cell or damage your laptop’s sensitive power rails.
Sourcing High-Quality Cells
Never harvest cells from old, generic power banks for a laptop project. Internal resistance varies between aged cells, leading to rapid imbalance. Use brand-name cells like Samsung 35E, LG MJ1, or Sanyo GA.
These "high-capacity" cells offer up to 3500mAh each. In a 3S2P configuration (3 series, 2 parallel), you can create a 7000mAh pack. This often doubles the capacity of original OEM batteries that typically use 2200mAh cells.
Spot Welding vs. Soldering
Professional DIYers avoid soldering directly onto battery terminals. The intense heat of a soldering iron can damage the internal chemical separators of a lithium cell. Instead, use a battery spot welder with nickel strips.
Nickel strips provide low resistance and a secure mechanical bond. If you must solder to the BMS pads, keep the heat exposure under three seconds. Use 20AWG or 18AWG silicone wire for the main power leads to handle the current without melting.
Wiring Logic and Insulation
Always wire the BMS starting from the negative (B-) lead and work your way up. This prevents accidental voltage spikes to the control IC. Most laptop BMS boards require a specific sequence: B-, B1, B2, and finally B+.
| Component | Recommended Material | Purpose |
| Interconnects | Pure Nickel Strip (99.9%) | High conductivity, low heat |
| Insulation | Kapton Tape | Heat resistant and non-conductive |
| Outer Wrap | PVC Heat Shrink | Physical protection and nesting |
Use Kapton tape to secure all sense wires. This polyimide film is incredibly heat-resistant and prevents wires from chafing against sharp nickel edges. A layer of "Barley paper" on the positive terminals adds an extra fail-safe against short circuits.
Thermal Management
Laptops dissipate significant heat, which can transfer to the battery. Place the NTC thermistor (the temperature sensor) in the center of the cell pack. This ensures the BMS can cut power if the internal temperature exceeds 60°C (140°F) during charging or heavy use.
Testing, Calibration, and Long-Term Maintenance
The final stage of your DIY project involves validating the safety and logic of the pack. Before closing the laptop casing, you must ensure the BMS communicates correctly with the operating system and manages the "fuel gauge" accurately.
Initial Voltage Verification
Before connecting the battery to your laptop, use a digital multimeter. Measure the voltage at the output terminals (P+ and P-). The reading should match the sum of the individual cell voltages.
If the output is 0V, the BMS may be in "Sleep Mode" or "Protection Mode." Many boards require a momentary connection to a charger to "wake up" the circuit. If the voltage is lower than expected, check your balance lead connections for a loose wire or cold solder joint.
Software Calibration and Handshake
Once installed, enter the Laptop BIOS/UEFI first. Check the "Battery Information" section to see if the system recognizes the manufacturer and capacity. In Windows, you can use tools like BatteryInfoView or the powercfg /batteryreport command.
The "Design Capacity" and "Full Charge Capacity" should ideally match. If the numbers are wildly inaccurate, you may need to perform a full calibration cycle. Charge the battery to 100%, let it rest for two hours, then discharge it until the laptop shuts down.
Best Practices for Longevity
To maximize the life of your custom pack, avoid keeping it at 100% charge while plugged into AC power for weeks. Lithium-ion cells degrade faster when held at high voltages in warm environments.
- Charge Thresholds: Set your laptop to stop charging at 80% if the BIOS supports it.
- Cooling: Ensure the battery area has adequate airflow; heat is the enemy of chemical stability.
- Storage: If storing the battery, keep it at 50% charge (approx. 3.7V per cell) in a cool place.
Final Safety Check
Monitor the battery temperature during the first three charge cycles. If the pack feels hot to the touch (above 45°C) while charging, stop immediately. High heat usually indicates a high-resistance cell or an undersized BMS.
By following these professional steps, you have transformed raw cells into a reliable, high-capacity power source. Your DIY battery is now a high-performance component that rivals, or even beats, original manufacturer specs.